Mac OS 세쿼이아 업그레이드 했다. Xcode 16으로 업그레이드 했다.

별다른 이슈가 없는 듯 했는데, iOS 빌드 후 testflight 업로드 하려니 이슈가 발생하였다.

*** Error: [ContentDelivery.Uploader.600000068240] Asset validation failed (90482) Invalid Executable. The executable 'Runner.app/Frameworks/AdFitSDK.framework/AdFitSDK' contains bitcode.

target build 버전 등의 차이로 인한 듯 한데. adFit SDK 쪽에서 처리해줘야 하나? 따로 직접 해결할 수 있나?

예전 비슷한 이슈인가? 다른 이슈? https://devtalk.kakao.com/t/appstore-minimum-os-version/135747


[AppStore] 테스트플라이트 아카이브 안됨(minimum OS Version 관련)

문의 시, 사용하시는 SDK 버전 정보와 디벨로퍼스 앱ID를 알려주세요. 현재 사용 SDK 버전 - 2.21 제가 현재 엑스코드에서 테스트플라이트를 위해 아카이브를 했는데 아래와 같은 에러가 계속 뜹니

devtalk.kakao.com

메시지는 동일한 것은 아닌데, 빌드시 버전 이슈를 본것 같아서 일단 정리.

다른 정확한 해결책을 찾아보는 중.

관련이슈 2 - https://developer.apple.com/forums/thread/764576


Invalid Executable. The excecutabl… | Apple Developer Forums

After upgrading to XCode 16, while uploading apps to app store, it's throwing below error and not letting me upload it. It's iOS app. Please help. Invalid Executable. The excecutable ......app/Frameworks/hermes.framework/hermes contains bitcode.

developer.apple.com

역시나 SDK 쪽에서 지원해줘야 하나...


[해결책] bitcode 에러 조치 - Xcode 16

관련이슈 3 - https://medium.com/@hyosing92/ios-bitcode%EC%99%80-%EA%B4%80%EB%A0%A8-issue-4643dc841af7


[iOS]Bitcode와 관련 Issue

Bitcode 관련 이슈와 왜 deprecate되었을지

medium.com

위 글 내용상 - 직접 bitcode 를 제거해줘야 하는 듯 하다.

ios/Podfile

post_install do |installer|
  installer.pods_project.targets.each do |target|
    if target.name == 'AdFitSDK'
      `xcrun --sdk iphoneos bitcode_strip -r Pods/AdFitSDK/Frameworks/AdFitSDK.framework/AdFitSDK -o Pods/AdFitSDK/Frameworks/AdFitSDK.framework/AdFitSDK`
    end

  end
end

본인의 코드중 에러나는 위치를 확인한다. 내 경우는 아래 경로.

Pods/AdFitSDK/Frameworks/AdFitSDK.framework/AdFitSDK

(SDK 종류마다 해당 위치가 차이가 난다 - Pods 에서 해당 경로 확인)

실제 동작은 체크해봐야겠다. Xcode > Product > archive 로 확인해보니

에러 메시지는 사라졌다. 아래의 경고메시지가 거슬르긴 하지만, testflight 로 업로드는 된다.
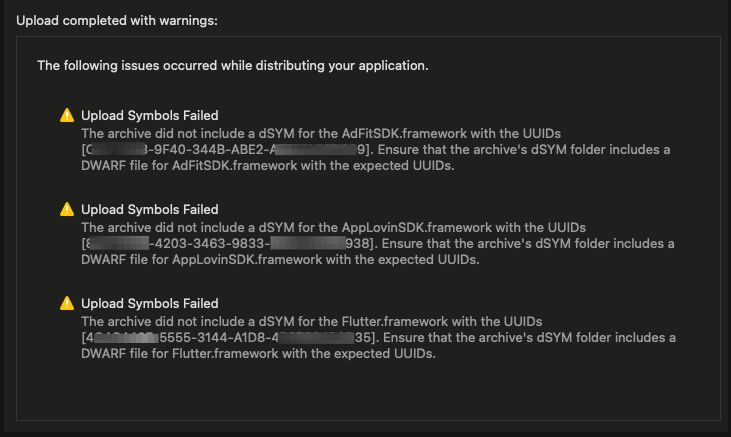
실제 내부테스트 배포가 되는지 체크해봐야 겠다. (위 경고 메시지 제거방법은 따로 체크)

...

내부테스트 정상 배포되었다. - 일단 긴급 이슈는 해결

반응형

WRITTEN BY
1day1
하루하루 즐거운일 하나씩, 행복한일 하나씩 만들어 가요.

,

nestJS 공부를 하면서, 디비는 postgres 를 사용하고 있다. https://blog.1day1.org/720


coolify - Github App 을 사용해서, git push 하면 자동 배포하자

지난글에 nestJS 앱을 dockerfile 을 사용해서 배포하는 방법을 정리했다. https://blog.1day1.org/719 coolify 를 사용해서 nestJS + postgres 앱을 배포해보자coolify 를 써보다 보니 재밌다.처음이라 좀 헤맨 부분

blog.1day1.org


한동안은 postgres 를 사용할 듯 하다.

관련 필요한 명령등을 정리해본다.

일단 설치부터.

# https://www.postgresql.org/download/macosx/


PostgreSQL: macOS packages

macOS packages You can get macOS PostgreSQL packages from several sources. Interactive installer by EDB Download the installer certified by EDB for all supported PostgreSQL versions. Note! This installer is hosted by EDB and not on the PostgreSQL community

www.postgresql.org

해당 부분에서 다운로드 해서 설치 - 설치는 무난하니 패스.
(혹시 기존 brew install postgresql 이 있었는데, 혼동될까봐 brew 패키지는 삭제했다.)


# .bash_profile / .zshrc 명령 path 등록.

# postgresql 16
export PATH="/Library/PostgreSQL/16/bin:$PATH"


# 맥OS 터미널에서 관리하는 주요 명령들

디비 서버 상태 보기

# sudo -u postgres pg_ctl -D /Library/PostgreSQL/16/data/ status

pg_ctl: server is running (PID: 83175)
/Library/PostgreSQL/16/bin/postgres "-D" "/Library/PostgreSQL/16/data"

디비 서버 중지 / 실행

$ sudo -u postgres pg_ctl -D /Library/PostgreSQL/16/data/ stop

waiting for server to shut down.... done
server stopped

$ sudo -u postgres pg_ctl -D /Library/PostgreSQL/16/data/ start

waiting for server to start....
2024-09-08 23:43:17.987 KST [83267] LOG:  redirecting log output to logging collector process
2024-09-08 23:43:17.987 KST [83267] HINT:  Future log output will appear in directory "log".
 done
server started


그외 주요 명령들

데이터 입력 / 테이블 관리 등등.

... 계속 정리...

반응형

WRITTEN BY
1day1
하루하루 즐거운일 하나씩, 행복한일 하나씩 만들어 가요.

,

지금까지의 삽질(?)은 콘솔 환경에서 개발을 편하게 할 수 있게 세팅하기 위함이다.
Language Server Protocol (LSP) 가 최종 목적이 될 듯 하다.

mac os 와 byobu 를 사용하니, 몇몇 단축키가 충돌되거나 한다.
CTRL + 화살표(Left / Right) 등

1. 일단 터미널에서 단어간의 이동이 안된다. 다른 조합으로 바꾼다. (터미널 쪽에서 설정이 필요 - alacritty)

위치 .config/alacritty/alacritty.toml

bindings = [
  { key = "Right", mods = "Alt", chars = "\u001BF" },
  { key = "Left",  mods = "Alt", chars = "\u001BB" },
  { key = "F",  mods = "Control|Shift", action = "ToggleFullscreen" }, # full screen
 ]

CTRL 을 Alt (mac Opt 키) 조합으로 바꾼다.
Ctrl + Shift + F 로 전체화면 변경도 추가했다.


2. byobu 에서 Alt + Left/Right 는 윈도우 간의 전환인데, 위 터미널 설정이 우선하는 것 같다.

대신 동일 기능으로 CMD + Left / Right 로 전환 가능하다.

byobu ( tmux ) 의 단축키를 F1~F12 등을 사용하기도 하는데.

난 CTRL+a 의 조합을 사용하기 좋아한다.(Mac 에서는 Fxx 키를 입력하기 불편하다. fn 키를 같이 입력해야함)
tmux 는 ctrl+b 를 사용하나보다. byobu 쪽은 ctrl+a 를 사용한다.

CTRL+a 는 prefix 또는 Leader 키라고 한다.

CTRL+a 입력 후 조합단어. 대소문자 구분 ( 동일 키 )

+ c : 새윈도우 열기 ( F2 동일 )
+ n : 다음 윈도우 ( CMD + Right )
+ p : 이전 윈도우 ( CMD + Left )
+ ctrl-a : 바로 이전 윈도우

+ , : 윈도우 이름 변경 ( F8 )

+ d : detach  ( F6 )

+ % : 창 수직 분리 pane 
+ | : 창 수평 분리

pane 간 이동 ( Shift + Up/Down/Left/Right )

pane 간 사이즈조절 ( Shift + Opt + Up/Down/Left/Right )


3. byobu 에서 pane 을 나눈 후 마우스 스크롤을 pane 단위로 하도록 설정

# cat .config/byobu/.tmux.conf
set -g mouse on

위 항목 추가.

위 설정을 하니, pane 단위 스크롤이 되기는 한데, 복사하기 위해 마우스 드래그가 이상해 진다.
그냥 Alt + F12 로 위 옵션을 on / off 할 수 있으니, 이 방법이 나을 듯 하다.

CTRL+a + : (: 콜론, not ; 세미콜론)
으로 명령 모드로 들어간 후
set -g mouse on
set -g mouse off

직접 명령을 실행해도 된다.


4. 방향키 ( Arrow Key ) 를 다른 조합으로 바꾼다.

키보드의 방향키를 쓰기 불편해서 다른 키조합으로 바꾸고 싶다.(키캡을 교체하면 좀 나을려나?)
- 기존 텐키리스 쓰다가, 텐키 로 바꿨는데, 방향키가 적응이 안되네(유독 방향키가 구분이 안되는 키보드이긴 하지만)

alacritty + zsh + byobu(tmux) 조합에서 방향키를 다른 키로 바꾼다. ( alt + h j k l 으로 변경 )
alacritty 는 시도해봤는데, 안되거나 어렵다. 키코드값 chars 를 알아내기가 어렵다. 포기...

그래서 zshrc 에서 세팅하기로 한다. ( alt 가 ^] 라고 하는데, 맥이라 그런지 안되고 아래처럼 해야 된다.)

# cat .zshrc

bindkey "˙" backward-char
bindkey  "∆" down-line-or-history
bindkey  "˚" up-line-or-history
bindkey  "¬" forward-char

이렇게 바꾸니 좀 나아졌다. (키보드를 바꾸는게 상책이려나?)

- 그냥 다시 텐키리스 키보드로 바꿈.

반응형

WRITTEN BY
1day1
하루하루 즐거운일 하나씩, 행복한일 하나씩 만들어 가요.

,

mac os 의 기본 shell 은 bash 로 되어 있는 것 같다.
chsh -s /bin/zsh 로 바꾸라는 안내도 나오지만, 그냥 쓰기로 했다.

다만, neovim 을 쓰기 위해 alacritty 를 쓰면서 zsh 를 써보기로 했다. (https://blog.1day1.org/693)
alacritty 가 따로 탭기능은 없어서, byobu 를 쓰기로 했다.

brew install byobu 로 설치

실행하니 기본쉘인 bash 로 실행이 된다. byobu 쓸때도 zsh 를 쓰고자 한다.

# cat .config/byobu/.tmux.conf
set -g default-shell /bin/zsh
set -g default-command /bin/zsh

위 파일명이 비어 있는데, 위 두줄을 넣어준다.

정상으로 zsh 가 기본으로 실행된다.

간만에 byobu 를 쓰려니 단축키가 잘 생각이 안난다.
자주 쓰던 키를 정리해둬야 겠다.

Shift-F1 을 누르면 단축키가 나온다. ( 아래와 같은데, 난 좀 다르게 사용한다. 그 부분을 따로 정리.)

  F1                             * Used by X11 *
    Shift-F1                     Display this help
  F2                             Create a new window
    Shift-F2                     Create a horizontal split
    Ctrl-F2                      Create a vertical split
    Ctrl-Shift-F2                Create a new session
  F3/F4                          Move focus among windows
    Alt-Left/Right               Move focus among windows
    Alt-Up/Down                  Move focus among sessions
    Shift-Left/Right/Up/Down     Move focus among splits
    Shift-F3/F4                  Move focus among splits
    Ctrl-F3/F4                   Move a split
    Ctrl-Shift-F3/F4             Move a window
    Shift-Alt-Left/Right/Up/Down Resize a split
  F5                             Reload profile, refresh status
    Alt-F5                       Toggle UTF-8 support, refresh status
    Shift-F5                     Toggle through status lines
    Ctrl-F5                      Reconnect ssh/gpg/dbus sockets
    Ctrl-Shift-F5                Change status bar's color randomly
  F6                             Detach session and then logout
    Shift-F6                     Detach session and do not logout
    Alt-F6                       Detach all clients but yourself
    Ctrl-F6                      Kill split in focus
  F7                             Enter scrollback history
    Alt-PageUp/PageDown          Enter and move through scrollback
    Shift-F7                     Save history to $BYOBU_RUN_DIR/printscreen
  F8                             Rename the current window
    Ctrl-F8                      Rename the current session
    Shift-F8                     Toggle through split arrangements
    Alt-Shift-F8                 Restore a split-pane layout
    Ctrl-Shift-F8                Save the current split-pane layout
  F9                             Launch byobu-config window
    Ctrl-F9                      Enter command and run in all windows
    Shift-F9                     Enter command and run in all splits
    Alt-F9                       Toggle sending keyboard input to all splits
  F10                            * Used by X11 *
  F11                            * Used by X11 *
    Alt-F11                      Expand split to a full window
    Shift-F11                    Zoom into a split, zoom out of a split
    Ctrl-F11                     Join window into a vertical split
  F12                            Escape sequence
    Shift-F12                    Toggle on/off Byobu's keybindings
    Alt-F12                      Toggle on/off Byobu's mouse support
    Ctrl-Shift-F12               Mondrian squares
반응형

WRITTEN BY
1day1
하루하루 즐거운일 하나씩, 행복한일 하나씩 만들어 가요.

,

예전에 우분투에서 autossh 를 설정하는 법을 정리했었다.( blog.1day1.org/615 )

맥미니 도 같이 쓰고 있는데, 맥미니도 설정해보고자 한다.(그동안 딱히 사용할 일은 없었다.)

맥에서는 brew 로 autossh 를 설치한다.

brew install autossh

이제 자동으로 실행되도록 설정한다. 우분투의 systemd 와 비슷한 launchctl 을 사용한다.

다음과 같은 설정.( ooo.plist 파일은 임의로 만들면 된다. )

$ cat Library/LaunchAgents/org.1day1.macmini.plist

<?xml version="1.0" encoding="UTF-8"?>
<!DOCTYPE plist PUBLIC "-//Apple Computer//DTD PLIST 1.0//EN" "http://www.apple.com/DTDs/PropertyList-1.0.dtd">
<plist version="1.0">
<dict>
    <key>Label</key>
    	<string>1day1 org macmini</string>
    <key>KeepAlive</key>
    	<true/>
    <key>RunAtLoad</key>
    	<true/>
    <key>ProgramArguments</key>
    <array>
        <string>/usr/local/bin/autossh</string>
	<!-- autossh switches -->
        <string>-M</string>
        <string>0</string>
	<!-- ssh switches -->
        <string>-N</string>
        <string>-T</string>
	<string>-o</string>
	        <string>ControlMaster no</string>
	<string>-o</string>
        	<string>ServerAliveInterval 60</string>
	<string>-o</string>
        	<string>ServerAliveCountMax 3</string>
	<string>-p</string>
        	<string>2222</string>
	<string>-l</string>
        	<string>root</string>
	<string>-i</string>
        	<string>/Users/your-mac-user-name/.ssh/id_rsa</string>
	<string>-R</string>
        	<string>9191:127.0.0.1:5900</string>
	<string>-R</string>
        	<string>9122:127.0.0.1:22</string>
	<string>your-externel-server</string>
    </array>
</dict>
</plist>

-p 2222 -l root -i 비밀키 , your-externel-server  => 이 부분들은 본인에 맞게 수정해서 사용한다.

다음처럼 실행.

launchctl load -S Aqua Library/LaunchAgents/org.1day1.macmini.plist 

실행되어 있는지 확인.

$ launchctl list |grep 1day1
23391	0	1day1 org macmini

터널링 서버에 접속이 되어 있는지 확인한다.

이제 임의의 곳에서 맥미니에 접속할 수 있게 된다.


반응형

WRITTEN BY
1day1
하루하루 즐거운일 하나씩, 행복한일 하나씩 만들어 가요.

,

도커는 주로 우분투(리눅스)에서 사용하고 있다. 그래야 제대로된 성능이 나오기 때문이다.

그런데, 개발/테스트 등을 위해 맥os 에서 사용하고자 한다.

설치는 쉽다. https://www.docker.com/products/docker-desktop 에서 다운로드 후 설치하면 된다.

도커를 실행하면, 로그인은 꼭 필수는 아니다.(본인의 도커 이미지등을 docker hub에 등록하고자 하면 필요)
그냥 로컬에서 실행/테스트 할때는 굳이 필요없다.

대시보드 - 괜찮네

끝.

도커를 연습해 보고자 한다면, https://docs.docker.com/get-started/ 를 참조한다.


도커 데스크탑 이 쿠버네티스도 지원하는 듯 하다. 설정을 해봤다. 쓸만한 지는 체크해봐야겠다.

반응형

WRITTEN BY
1day1
하루하루 즐거운일 하나씩, 행복한일 하나씩 만들어 가요.

,